![]()
![]()
![]()
![]()
| Search: |
|
How To Update an Existing Role With Additional Permissions
|
Overview: This walkthrough explains how to update an existing Role with a new recording.
We want to add additional permissions to the Role without removing any existing permissions.
This example uses the Create Sales Orders Role that was created using the FAQ entitled How to Create
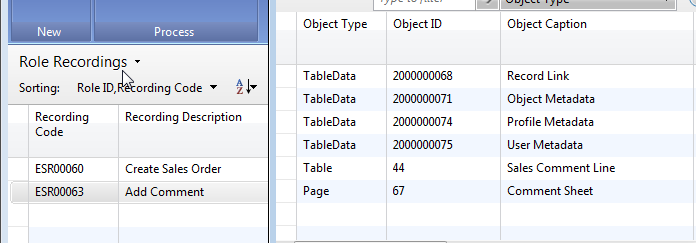
a New Role Using SQL Profiler. The link to that FAQ is below. How To Create a New Role Using SQL Profiler FAQ entitled How to Create a New Role Using the Client Monitor. The link to that FAQ is below. How To Create a New Role Using the Client Monitor FAQ explains How to Create a New Role Using Role Builder. The link to that FAQ is below. How To Create a New Role Using Role Builder Additional permissions will be added to the Create Sales Order Role. However, these same steps can be used to update any existing Role with additional permissions. For this example, it is assumed that the new recording we want to add has already been created. The new Recording will add permissions to access the Comment box from a Sales Order. This was accidentally omitted in the original Recording. If assistance is required in creating a recording, please refer to one of the FAQ links above. As can be seen below, the CREATE Sales Order Role currently has access to 12 Pages plus other objects that are not showing in the screen shot. The Origin of the 12 Pages is Recorded. This means these 12 Pages were used in the process of creating a Sales Order and were therefore recorded. 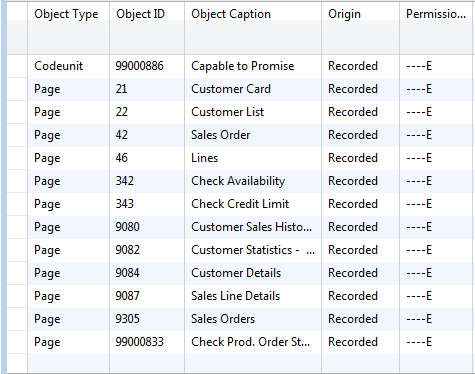
The Line information shows that the Create SO Role has 287 Role Permissions and 155 TableData Role Permissions. 
To update an existing Role with a new recording to add additional permissions: 1) In the Easy Security Company, click on the line for Role ID CREATE SO. 2) Click on Add New Recording to open the Recordings window. Edit the List and add a Description. Add the path to the SQL Profiler Trace created earlier and click on Import SQL Profiler Trace. 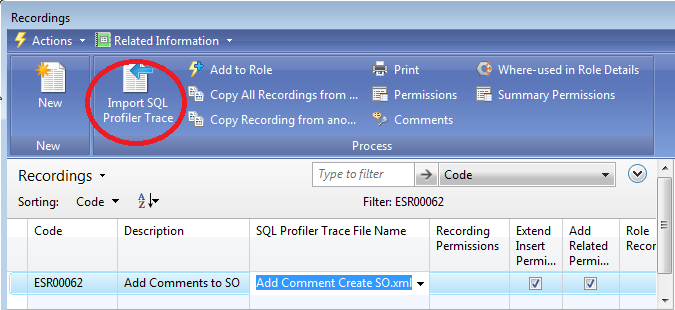
3) Once the trace file import has completed, review the information displayed in the Trace Client window. Edit the list and remove the checkmark from the lines that do not need to be imported. Click the OK button. 
4) A window displays a summary of the data that was imported. Click the OK button to close the message window. Click the OK button to close the Recordings window which will attach the recording to the Role. 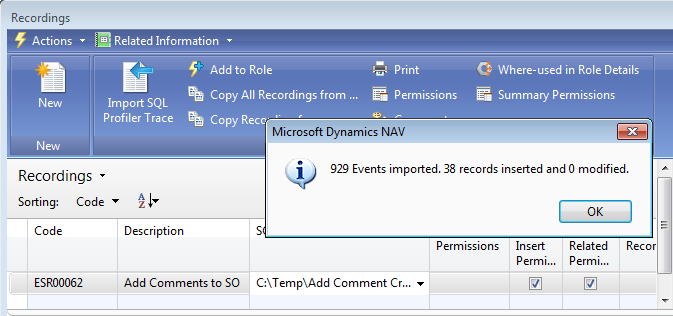
5) Note that the number in the Role Recordings field now says 2, but the fields Role Permissions and TableData Role Permissions still show their original values of 287 and 155. 
6) Click Update Role to update the role with the information from the new recording. A window displays a summary of the data that was updated. Click OK to close the summary window and click OK again to close the Role Card. 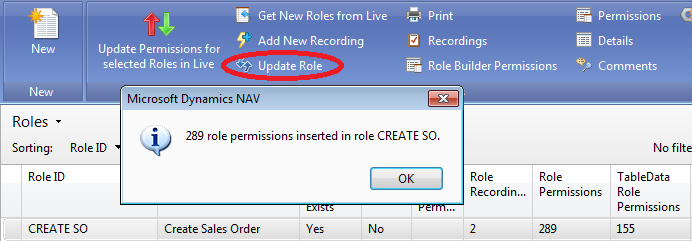
7) Note that the number in the Role Permissions field updated from 287 to 289. You may need to refresh the line. One of the Role Permissions is for the Comment Sheet Page which was added during the last Recording. 
8) Publish the changes to the Live Permissions. Any Login ID that has the CREATE SO Role assigned to it will have the new permissions. |
|
Like  Don't Like
© 2024 Mergetool.com. All rights reserved. 
|
Related resources
Download software from Mergetool.com