![]()
![]()
![]()
![]()
| Search: |
|
How to Record Permissions Using the SQL Profiler
|
Recording Permissions with SQL Profiler (5:47) Recording Using NAV 2017 Internal Recorder (5:44) Overview: This provides information to make a Permission Set recording using the SQL Profiler. To view this information in a video, see the video link above entitled Recording Permissions with SQL Profiler. This FAQ assumes that a Service Tier has already been set up to use in making recordings. It is very important to restart the Service Tier before making each recording when using the SQL Profiler. When processes are run in NAV, the objects that are used in the process are stored in Cache. If an object is stored in Cache, the SQL Profiler recording cannot capture the object when it is used by another process. And that will make a recording incomplete. To make sure that all the required objects are captured by the SQL Profiler when a recording is made, the Service Tier must be restarted before making EACH recording. In NAV 2013 and later versions, both the objects and data are stored in Cache. It is recommended that the User making recordings be assigned the Easy Security Recording Role Center. This Role Center has a minimum number of permissions. This will prevent objects from being called from the server when the User logs into NAV. If objects are called from the server by the Role Center that is assigned to the User making recordings, these objects will not be picked up by the SQL Profiler. To make a recording using the SQL Profiler: 1. Restart the Service Tier that is being used to make the SQL Profiler recording. This will clear all objects and data from Cache. 2. Open NAV and select the appropriate company. 3. Open the SQL Profiler. 4. Start a New Trace and connect to the correct server. 5. On the Events Selection tab, set a filter for the correct database. The % sign is a wild card in SQL. If the wild card is used, the entire text of a filter does not have to be entered. For additional information on setting filters - see How to Set Up and Test a Service Tier for Making a Recording 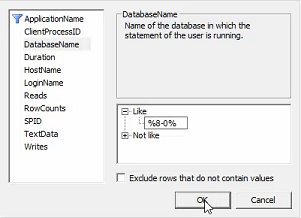
6. Click the Run button to start the trace. 7. Return to NAV and open a company that has data in it. 8. Notice that the SQL Profiler has been capturing information all this time. You do not want this information to be included in the Permission Set Recording. A Permission Set Recording should be for one task only. In our example, that task is to edit the Customer Card. Stop and restart the trace file. This will clear the information from the trace and a new empty trace will be started. 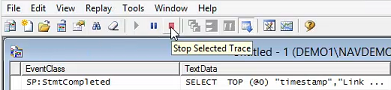
9. Open a Customer Card and add text in the Address 2 field. Close the Page so the data is validated and saved in the database. 10. Stop the trace and Save As _ Trace XML File and name it Edit Customer. 11. Open the Easy Security Company. 12. Open the Permission Sets list and create a new Permission Set called Edit Customer. 13. Click on Add New Recording and browse to and import the Edit Customer.xml file. Permission Sets can also be built manually by using the Builder Permissions Action. 14. The imported information is displayed in multiple lines in the Trace Clients window. The data is sorted by Service Tier and by Company. To prevent a line from being processed, remove the checkmark from the Include in Rec. Permissions fields. Generally speaking all of the lines should be processed. The values displayed in the various columns can be drilled into for more detailed information. 
15. Click OK to process the Recording. A message displays summarizing the data that was processed. In our example, 45 records were inserted. 16. The Recordings screen opens. Click on the Permissions Action to view the types of permissions that are assigned for each object by the Recording. In our example, adding text to the Address 2 field required Modify permission for the Customer Table (18) and the Contact Table (5050). The Modify Required field is checked for both tables. 
17. Click OK twice to attach the Recording to the Permission Set. After the Update Permission Set process is run, a message displays the total number of Permissions that were added to the Permission Set. In our example, notice that the number of records inserted increased from the original number of 45 to 106. 18. The additional Permissions were added to the Permission Set based on the information gathered by the Source Code Analysis. Easy Security reads the code in the Tables and determines which objects a process needs access to. Those objects are then added to the Permission Set along with the correct permissions. 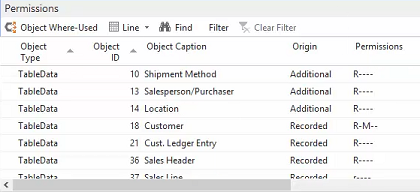
19. Additional Permissions can be added manually to Permission Sets by using the Builder Permissions Action. Additional permissions can also be added to Permission Sets by adding a new or an existing Recording. 20. Select the S&R-CUSTOMER, EDIT Permission Set. Click on the Recordings Action to open the Edit - Permission Set Recordings window. There are no existing recordings because this is one of the standard Permission Sets that is delivered with NAV. 21. Drill down into the Recording Code field and select the Edit Customer Recording made earlier. Update the Permission Set with the Recording. 22. In our example, the original 117 Permissions for the S&R-CUSTOMER EDIT Permission Set changed to 177 based on the information from the Recording. 23. Open the Permission Set Card and view the lines. Lines that have Recorded or Additional in the Origin field were added by the Recording. 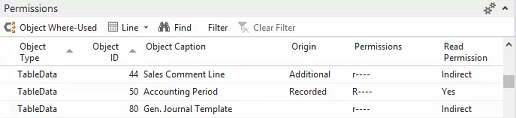
24. To summarize the important points: a. Assign the Easy Security Recording Role Center to the User making the recordings b. Restart the Service Tier before each Recording to clear the Cache c. Only one user should be connected to the Service Tier d. Use the SQL Server Profiler to record the process e. A Recording can be added to an existing Permission Set f. Or a Recording can be added to a new Permission Set g. Process one of the Publish routines to push the Permission Sets to the Live Companies |
|
Like  Don't Like
© 2024 Mergetool.com. All rights reserved. 
|
Related resources
Download software from Mergetool.com