![]()
![]()
![]()
![]()
| Search: |
|
How to Build Permission Sets Using a SQL Profiler Recording or Builder Permissions
|
Video:
Recording Permissions with SQL Profiler (5:48) Video: Recording Using NAV 2017 Internal Recorder (5:45) Video: Building Permission Sets (20:52) Overview: This provides step-by-step instructions to build a Permission Set. Two methods can be used to create a Permission Set. You can make recordings using either the SQL Profiler or the NAV 2017 Internal Recorder. The second method is to use the Builder Permissions feature. The standard NAV Permission Sets released by Microsoft were converted to use Builder Permissions. This FAQ assumes that a Service Tier has already been set up to use in making recordings. For assistance in creating a recording Service Tier, see: Add New Service Tier for Recording (12:03) 1. Restart the Service Tier to clear the Cache. 2. Open NAV 3. Start the SQL Server Profiler 4. Start a New Trace 5. Select the correct Server 6. Set a filter for the correct database 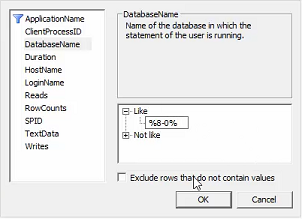
7. The trace captures data even when the user is not performing a task in NAV. This activity is due to the system checking for new data and new objects. 8. Return to NAV and open a Customer Card. Add some text to Address 2. Close the Customer Card. It is important to close the Page. This is when the data is validated and saved by NAV. Several objects can be used in the validation and saving steps. 9. Stop the trace and save the file as a Trace XML File. 10. Return to NAV and create a new Permission Set called Edit Customer. 11. Click the Add New Recording Action. Browse to and open the .xml file just created. The file is processed and the information is sorted by database, by user, by client type and by Company. Remove the checkmark from the Include in Rec. Permissions field on any lines that you do not wish to include in the recording. Our example processes all the lines. You can also drill down into the values in the columns for additional information. 12. Click OK to add all the lines. A summary message appears showing that 49 records were inserted. 13. Click on the Permissions Action to view the permissions that were assigned based on information from the recording. Notice the Read and Modify permissions for both the Customer and the Contact. Only the Customer was changed. But due to the relationship between the Customer and the Contact - changes made to the Customer update the Contact. Easy Security knows about these types of relationships due to the information from the Source Code Analysis. And the SQL Profiler captures all this information in the recording. 

14. Click OK to attach the recording to the Permission Set and accept the Update Permission Set request. A summary message appears showing that 110 Permissions were inserted. 15. The Permission Lines with an Origin code of Additional were added based on the information from the Source Code Analysis. Also Pages and Codeunits were added with the Execute permission. 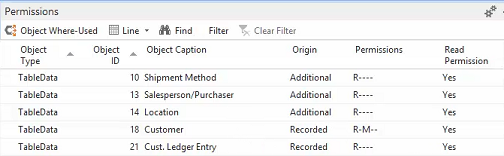
16. Recordings can also be used to correct or add additional permissions to existing Permission Sets. 17. Open the NAV standard Permission Set S&R-CUSTOMER, EDIT. 18. Click on the Add New Recording Action. Select the same .xml file that was used earlier to create the new Permission Set. A message displays that the same 49 records were added. 19. When the recording is attached to the Permission Set and the Update Permission Set function runs, the total permissions for this Permission Set changed from 117 to 181. 

20. View the individual Permission lines to see which Permissions were added. Any added Permission will have Additional or Recorded in the Origin column. You can add as many recordings as you want to a Permission Set. The remainder of this FAQ provides step-by-step instructions to build a Permission Set using Builder Permissions. The standard NAV Permission Sets released by Microsoft have been converted to use Builder Permissions. Builder Permissions can be used to add Permissions to objects one line at a time or by using a range of numbers for an object type. Certain object number ranges are reserved for use with certain functionalities in NAV. Such is the case with the object number range of 5000 through 5199. This number range is reserved for use in the CRM functional area of NAV. To create a Permission Set that will provide access to all the TableData in the CRM functional area of NAV: 1. Create a new Permission Set called SUPER (DATA CRM). 2. Click on Builder Permissions Action to open the Edit - Builder Permissions window. 3. In the Object Type field, select TableData. In the Object ID field, enter 5000. In the To Object ID field, enter 5199. Set the Permissions to RIMD- for the line. Using this feature, permissions of Read, Insert, Modify and Delete were just given to 200 TableData objects. 
4. Notice that no name appeared in the Object Caption field. That's because Table 5000 does not exist in the database. However, Easy Security allows this to be done. When Table 5000 is created, it will already be included in the permissions for this Permission Set. 5. Run the Update Permission Set Action and notice that 70 Permissions were inserted for the Permission Set. 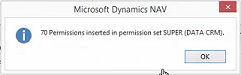
7. Using the number range feature of Builder Permissions makes it easy to create Permission Sets to cover the entire custom development range of objects, the object number range of ISV solutions, etc. 8. Click on Builder Permissions Action again to return to the Edit - Builder Permissions window. 9. Move to the far right end of the lines to show the Add Related Permissions field. Enter a checkmark in the Add Related Permissions field. 
10. Run the Update Permission Set Action from the Permission Set Card window. A message displays that 155 Permissions were inserted for the Permission Set. 11. View the Permissions lines and see that many of the lines show an Origin of Additional. These permissions were assigned based on information from the Source Code Analysis. The Source Code Analysis was used when the Add Related Permissions function was run. 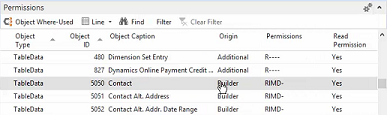
12. The Add Related Permissions feature can also be used to correct existing Permission Sets. Click on the P&P-VENDOR, EDIT Permission Set and click the Permissions Action to show the Builder Permission lines. 13. Select the line for TableData 23 - Vendor. Move to the end of the line to view the Add Related Permissions field. Enter a checkmark in this field and run the Update Permission Set Action from the Permission Sets list. 14. View the lines of the P&P-VENDOR, EDIT Page and notice that 5 more lines were added with the Origin of Additional. These permissions were assigned based on information from the Source Code Analysis. The Source Code Analysis was used when the Add Related Permissions function was run. 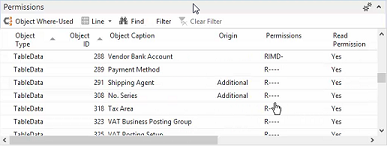
|
|
Like  Don't Like
© 2024 Mergetool.com. All rights reserved. 
|
Related resources
Download software from Mergetool.com