![]()
![]()
![]()
![]()
| Search: |
|
Definition of Fields on the Publish Permissions Window
|
Publishing Permissions is the process of pushing all permission changes that are created in the Easy
Security Company to the Live Permissions. You can manually run the Publish Permissions process or set
it to run at a specified time by using the Navision Application Server (NAS). For information on how to set up the NAS to run the Publish Permissions feature,
click the following link. Install NAS (NAV Application Server) as Job Queue for Easy Security Processing Below is a definition/explanation of each of the fields that appears in the Edit Publish Permissions window. NOTE: It is recommended that all of the fields in the Publish Permissions window be checked except for the Status field. This will help keep the permissions in a more consistent state. A checkmark in the Status box causes confirmation messages to display. These messages require user intervention for the publishing process to continue. This means that a user needs to be present during the Publishing routine to respond to the confirmation messages for the Publishing to complete. You may not want old Restore Points deleted every time the Publishing routine is run. If you do not, then remove the checkmark from the Delete Old Restore Points field. Only experienced users should remove checkmarks from the other fields. Synchronize Live -> Easy Security: Clink the link below for information regarding what the Synchronize Live -> Easy Security action does. How To Synchronize Data Between Easy Security and Live 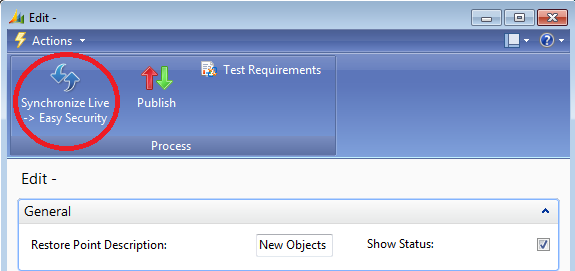
General Tab: 
Restore Point Description: Enter a name for the Restore Point that describes the changes that are being published. If the Restore Point Description field is not populated, Restore Points that are created will be automatically identified using the numbering system established in Security Setup on the Restore Point tab. During the Publish Permissions routine, two Restore Points are created. One Restore Point for the Live Permissions and one for Easy Security. A Restore Point is basically a snapshot of the current permissions of a company. The Restore Point provides the ability to roll back the permissions in a system to the previous set of permissions. This may be necessary if something did not work correctly on the new set of permissions or if it was determined that the changes should not have been made. Show Status: A checkmark in this box causes confirmation messages to display. These messages require user intervention for the publishing process to continue. Confirmation messages are presented after each step of the process. The messages show the results of the step that the Publish Permissions feature processed. Only the steps that are marked will be processed. Advanced Tab: 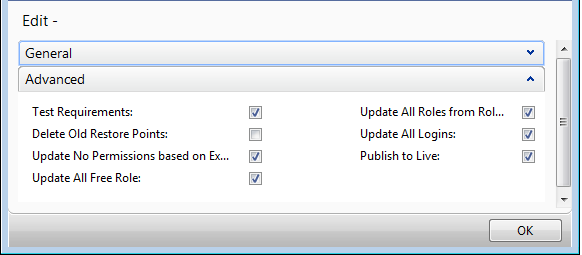
Test Requirements: Tests all the permission changes that have been made to make sure the permissions are consistent. For example it checks to see if permissions were added to an object that has since been deleted from the database. It also checks if Roles have been assigned to a user that has since been deleted, etc. Delete Old Restore Points: Entering a checkmark in this box causes previously created Restore Points to be deleted. The process will retain the number of Restore Points that is entered in the No. of Restore Points to Keep field. This field is on the Restore Point tab of the Security Setup window. Click the link below for more information on the fields on the Security Setup window. Definition of Fields on the Security Setup Window Update No Permissions based on Expiry Dates: When the Publish Permissions function is processed, Easy Security reviews Login Access Controls to see if any Expiry Date fields are populated. If any Expiry Date fields are populated, a calculation is performed to see if any of the dates has expired. If any of the Expiry Dates has expired, the program places a checkmark in the No Permissions field for that Access Control. The checkmark in the No Permissions field removes the permissions for the expired Access Control without actually removing any lines. This means the permissions can be added back at a later date by simply removing the checkmark from the No Permissions field and running the Publish Permissions function again. Update All Free: The objects included in the All Free Role are updated when the Publish Permissions function is performed. All Free is a list of all the objects that users have access to. Instead of maintaining a list of all the objects that users are denied access to, Easy Security maintains a list of the objects that users have FREE access to. If a new object is added to the database, this feature will automatically determine if the new object will be added to the All Free Role. It makes this determination based on the Object Properties of the object. Update All Roles from Role Details: This feature updates the Roles based on information from the Role Builder Permissions, Recordings and Source Code Analyzer. Many times running the Source Code Analyzer again will pick up changes that have been made and update the Roles based on this new information. Update All Logins: All Logins will be updated when this box is checked. Publish to Live: This step publishes/pushes the information from the Easy Security Company to the Live Permissions. Before this step happens, all the changes to permissions have been made only in the Easy Security Company. This step creates two Restore Points,one for the Easy Security Company and the second for the Live Permissions. The Restore Point for the Live Permissions can be used to put the permissions in the Live Permissions back to what they were before the Publish Permissions process ran. This is useful in case it was determined that some of the permissions were not correct or if it was decided that the changes should not be made. |
|
Like  Don't Like
© 2024 Mergetool.com. All rights reserved. 
|
Related resources
Download software from Mergetool.com