![]()
![]()
![]()
![]()
| Search: |
|
How To Create a New Role Group using Roles and Role Groups
|
Overview: This walkthrough shows how to use Roles and Role Groups to create Role Groups.
A Role is a set of permissions that allows a user to perform a specific task or activity.
A Role Group is made up of several Roles that allows a user to perform multiple activities.
A Role Group can hold hundreds of permissions. This is achieved by creating a Role Group and adding
multiple existing Roles or Role Groups to a new Role Group. The best way to maintain Logins in NAV is to use Role Groups. It is easy to get a high level overview of the permissions that are assigned to a Login when Role Groups are used. It is also much faster and easier to assign permissions to a Login using Role Groups. One Role Group can provide the same level of permissions that are contained in multiple Roles. It is recommended to include all information in a Role Group that is required to do a set of tasks. For example, when a user logs into the RTC, a Role Center provides the user with an overview of the tasks that the user performs. So a Role Center should be included in a Role Group. You can also add the Roles that all users might need such as ALL, BASIC or ALLFREE. Then add the functional Roles that the users need to perform their job activities. One Role Group can provide the same permissions that multiple Roles provide. But it is quicker and easier to assign only one line for a Role Group instead of assigning many lines for multiple Roles. To create a Role Group: 1) Open the Role Groups window and click New to open the Role Group Card. Add the following Roles to the Role Group along with the WAREHOUSE WMS Role Center. Click the OK button and select Open & New to accept the changes and open another new Role Group Card. 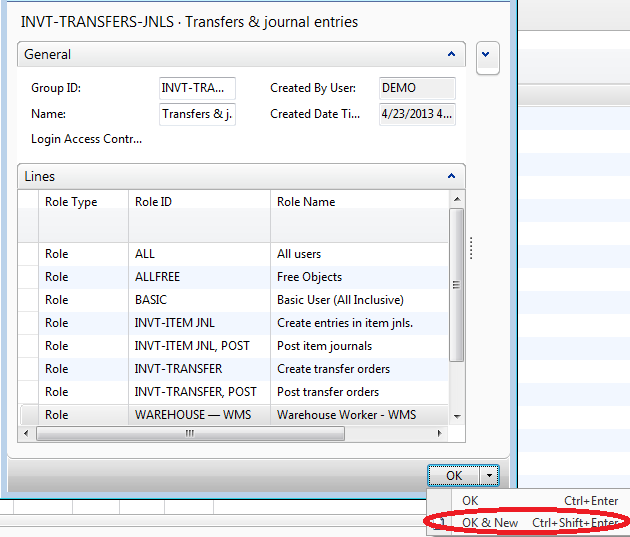
2) Add the Role Group created in step 1) above to this new Role Group and then add the WHSE Group Role ID. This new Group Role will have the combined permissions of the two Role Groups. Click OK to accept the changes. NOTE: Additional Roles or Role Groups can be added to this Role Group or any existing Role Group as needed. For example you could create a Role Group that contains only the permissions to set up functional areas of NAV, such as S&R Setup and P&P Setup. You could then add this new group to a manager Role Group and the manager will be able to set up these areas. 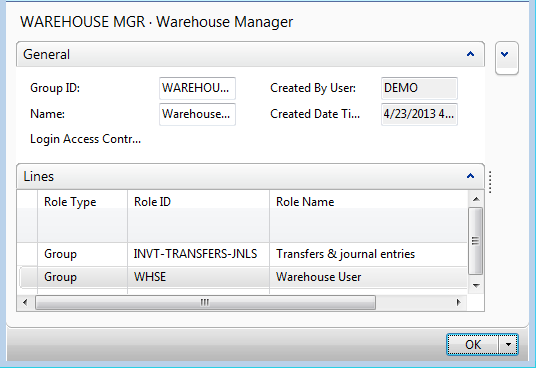
3) Click the OK button to accept the changes and close the new Role Group. The new Role Group is now displayed in the Role Groups list. You may need to refresh the Role Groups window to update the fields in the Role Group. The value of 2 in the Role Group Lines field makes it easy to see that this Role Group is made up of two other Role Groups. The Role Group is complete and ready to be assigned to a Login. NOTE: Click the following link for information on how to add a Role Group to a Login: How To Add an Access Control to a Login 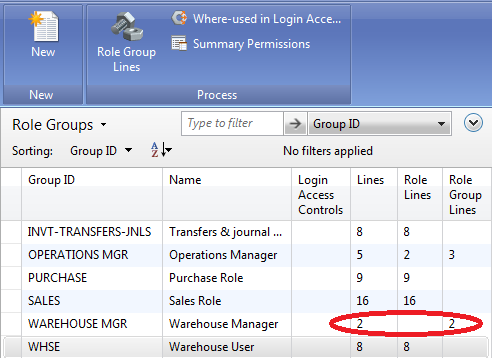
|
|
Like  Don't Like
© 2024 Mergetool.com. All rights reserved. 
|
Related resources
Download software from Mergetool.com